Interested in building your own suction dredge and saving some significant money? Here is how I did it......
No question that many gold prospectors would love to own a dredge, and dredges are very cool pieces of prospecting equipment, but the prices for new ones are really high. Don’t forget however, that in the earliest days of dredging, there were no manufacturers, and all small suction dredges were handcrafted units made in someone's garage. There's no question that a good dredge can be made at home, and I know you can save some significant money doing it, because I've done it myself. Building a dredge is a big project with a lot of plans and decisions to be made. Take your time and think about what you really want to build. Think about what materials you have on hand or what you could easily acquire, then build a list of what you need to construct your dredge. Unfortunately, a simple set of dredge plans that would work for all sizes of suction dredges is just impossible, so I've not tried to prepare any such thing. However, you can do it for your project. If you really sit down and think about things, and use measurements taken from the commercial dredge makers you can design your own set of plans for your specific dredge project. | ||
Of course you will be building on the cheap, but you don't want to shortchange yourself too much. You don't want your dredge to be rickety, or to fall apart, or to fail to function. Dredges need to be functional, durable and sturdy. The time you spend sorting through design concepts, deciding what you will build and how you will build it will be well spent. Think about what you want and what you need then weigh those together with what you can afford. Do up some drawings and lists. Perhaps the best thing I can suggest is that you study the designs of the well-known dredge makers like Keene and Pro-line. These manufacturers have done quite a bit of research studying their products, they have tested different options and have developed efficient pieces of equipment that do the job well. Check out their web sites as most have good photos of their dredges and the individual components that make up these dredges – you can get a lot of information from their web sites. If your local prospecting shop has a dredge set up, take a close look and even measurements or photos if you can. Another great possibility is to join a prospecting club whose members actively dredge, and then go out to the claims and check out the members while they are dredging. Take some pictures of the dredges while they're in operation. The club members may even let you have a few minutes behind the nozzle so that you can get a feel for the whole experience. The more general knowledge you have about dredges before you begin your design, the better your construction plans will be. | 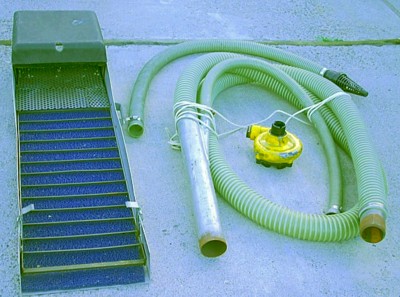 Sometimes good used dredge parts are available to start a homemade dredge. Sometimes good used dredge parts are available to start a homemade dredge. | |
| When you are sitting down to plan the designs of your own home made gold dredge, probably the first question you will want to ask yourself is “What size of dredge do I want to build?” The bigger your dredge is, the more material you'll be able to process, but the more it will cost and the more it will weigh. So weight and cost are the trade-offs for the volume you can process, and practically speaking, the depth of bedrock you will be able to reach. It is a general rule of dredges that it is not practical to dredge feet of overburden greater than the inside diameter of your hose in inches. So for a 2 inch dredge you don't want to go through overburden deeper than about 2 feet, for a 4 inch dredge you don't want to go through more than about 4 feet of overburden, and the 6 inch dredge would be limited to around 6 feet of overburden, etc. Of course it is possible to dredge a 10 foot deep hole with a 2 inch dredge, but it will take forever and be highly inefficient. This little rule of thumb does not count the depth of water, only the depth of overburden to bedrock. Another piece of design information to consider in your planning is that a four or five inch dredge is about as big as one guy can handle efficiently by himself. If you're really big, tough and young you may be able to handle a 6-inch by yourself, but it will tax you. A 4-inch is probably the best size for a single guy operation. | ||
Will you need compressed air for diving? If so, you will need an air compressor, an air receiving tank and related diving equipment. Air is really handy to have, but its optional, and you can always add air later if you plan well and allow space for the compressor on your dredge. Your homemade dredge will need a motor and a pump. If you want to dive, you will also need a compressor. I have developed a page to consider and discuss the purchase Mining Equipment component parts and elements. Before you make that buy, check it out at: Mining Equipment Component Parts Do you have the proper tools? Fabricating your own suction dredge takes tools. Things like a hack saw, pop rivet gun, drills, wrenches and the like are the minimum. Do you actually have the experience to build such a project? The more tools and fabricating skills you possess, the more likely it is that your home made dredge project will be a success. I have done up a page on hand tools for this type of project, you can check it out at: Mining Project Necessary Tools Having the ability to do some arc welding, or to bend and shear cut metal are also handy abilities to possess. My little 120V arc welder, while underpowered, has helped me complete some serious fabrication projects. If you don’t already own a welder, this project might be just the excuse you needed to buy one! I so strongly recommend that you consider buying one of these welders that I have done up a whole web page on it. If you are seriously considering building your own dredge, check out my page: Low Cost, Small Arc Welders For Home Use | 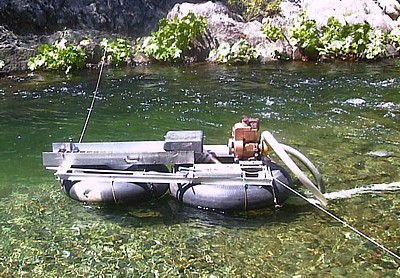 An earlier incarnation of my dredge, with the old crash box sluice from Keene. | |
| Count the cost and figure what is realistically possible: It’s not free! You can save a lot of money building your own home made dredge, but it still won't be cheap. I strongly recommend that before you actually begin to buy materials that you sit down with your design plan and figure those costs. Be sure you have enough money to complete your project. I decided to buy some parts from Keene, because I didn’t think I could fabricate an item as good as what they had to offer. On the other hand, I bought some used dredge components as well. All in all my 4 inch dredge cost less than 1/3 of what a new one would cost. Here are some of my comment on deciding what you will do for yourself and what you will buy: Near Impossible to make (but you might them get used): Engine: Hey, I’ve seen some really nice homemade dredges, but no one forges the steel to cast the block and make their own engine. You may be able to purchase a used engine and save a few bucks, but no one makes their own engine. Be sure your engine as the proper bolt holes for attaching the pump. Select a motor size to match the pump you will use. The manufacturers have certain motor sizes they use with certain pumps on dredges of a certain hose size. Plan to use the same sizes they use. Water Pump: Again, I’ve seen some really nice homemade suction dredges, but no one casts and machines the aluminum to make their own water pump. The centrifugal pumps used by all the dredge makers are well designed for this purpose. I recommend you purchase one of the pumps designed by Keene. I got my pump used at my local prospecting shop. Don’t use a trash pump and think you can pump the sand through the trash pump, saving the need for a jet. This is very bad design, and the heavy load of sand and gravel going thorough the trash pump will destroy it in a short time. They are also quite heavy and a larger motor is required than would be needed if a centrifugal pump and jet were used. | ||
| | ||
Air Compressor: I own a compressed air pump, but I have not gotten around to mounting it on my dredge. I have dredged for years with nothing more than a snorkel, but it does limit the areas that you can work. Long arms are real asset. Be sure if you do get one that you design your system so that it has room to fit in on the mount with the motor. Don't use a pump or hose that is not intended for producing breathable air - compressors for tools and paint systems add oil that you don't want to be breathing.... Hose: There are alternatives for hoses, but you need to be careful. Weak, thin walled materials will wear out. Transparency in a dredge hose is important to see where plug ups occur. The materials used by the dredge manufacturers is very suitable and durable and will get the job done. | 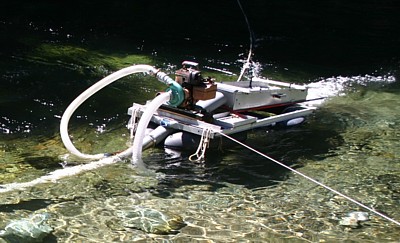 | |
Do-able With Some Effort: Sluice Box: A sluice box is probably the biggest and most important thing that you can make for yourself on a dredge. It's an key and critical item - hey, if your sluice box doesn't capture the gold, then your whole dredge project is a lot of wasted time. I've actually done up a whole separate webpage on designing and building the sluice box for your home made dredge. This page shows you what I did build my sluice box. Building a 3 stage sluice box for a gold dredge Header / crash box / flare: This is one where you have to decide what you want to do. You can go with a crash box style head and is relatively easy to make. A crash box is just a box that sits and the head of the sluice, directing the flow of water and gravel into the sluice. The other option is to go with a flair header which is much more difficult to make, but gets a lot better gold recovery. I chose to go to the expense and buy a plastic molded flare header from Keene for my dredge. I have also seen guys build flares out of Orange Plastic traffic cones. I recommend using a damper (a sheet of heavy rubber) to help control the water and slurry flow out of the box. Jet: This is a little difficult but not too bad if you have the right welding skills. First you have to decide if you want a suction nozzle or power jet type. The suction nozzle puts the high-pressure water in right at the nozzle. A power jet puts the high-pressure water in just before the sluice box. A suction nozzle is best in very shallow water; a power jet produces better overall suction. Most dredges are power jets, but some smaller units, 3 inches and smaller are suction nozzles. I recommend the power jet. Take a close look at the jets made by the manufacturers like Keene. Nozzle: Here's an easy project: really all you need is a piece of pipe about 10 inches long and of the right diameter to fit in your dredge hose. Simply take one end of the pipe and saw cut the pipe about every quarter inch. Take a hammer and gently tap the pieces down to form a cone on the tip. Weld a bead around the edge of your new nozzle and your done. You can even weld on a handle to the nozzle if you wish (I personally don't like them). | ||
Flotation: This is a part of a project where you can really save some money if you want to. There are a number of different flotation types which you might select for your project. In the early days of portable suction dredges, most were floated on large truck inner tube tires. These large inner tubes are both light and inexpensive. This is the option I chose for my home made dredge, but these large truck inner tubes are becoming more and more difficult to purchase. Few trucks still on the road use them and they are difficult to purchase even at tire centers specializing in large diesel trucks. Nowadays, most commercial suction dredges are built on plastic pontoons. They are more durable but they are also a lot heavier. There are a number of options in this direction as well. I have seen homemade dredges built on a variety of plastic pontoons. One interesting option is five to 10 gallon sized plastic shipping containers or barrels. Sometimes these can be purchased quite cheaply. Another option is to purchase the pontoons from the manufacturer, but in general these are quite expensive. The other part of the flotation system is the frame or mount for the sluice box and motor, allowing them to sit in a stable manner on top of your flotation units. I made my frame out of scrap aluminum purchased at the local junkyard. It was inexpensive and not difficult to construct. Because it was flat it sat easily upon my truck tubes. Foot valve: The foot valve is an important but often overlooked item. You can put one of these together from a piece of pipe and some heavy screening with just a bit of bailing wire and some tack welds. A fairly short time sucking pure sand can ruin your pump, so don't try to run your dredge without one - all the manufacturers supply them with the new dredges. ********************************* | ||
You will also need a wet suit of some sort, although the actual type depends on where you will be dredging for gold. Even in California in midsummer the water gets awfully cold after an hour or two if you do not have some sort of protection. In Alaska, much more serious protection such as a well-designed dry suit is needed so that you can stay in the water while operating your dredge. I have found that the junk yard / recycling yard can provide some important pieces that you may use at low prices. I suggest that one you have good plans for the dredge you want to build, take your purchase list and go look through the local scrap yards - you can get stuff there a whole lot cheaper than you would at somplace like Home Depot. You may even find a suitable used engine there. I suggest that once you have assembled all the pieces you need, the next step is to put your new dredge all together and test it. I suggest that you test it with a couple dozen pieces of small lead shot. Flatten them, and paint them red or some other bright color. Then suck up some gravel from the nearest gold bearing stream and put the shot in with the gravel you are processing. Be sure to take in a good bit of gravel both before and after you've sucked up the shot. When you clean up the sluice, count how many of the shot you have recovered and compare that to the number you started with. You should not lose more than one or two at the most. If you lose more than three or four you need to adjust your dredge or make some changes to improve it so you can be confident you are not loosing gold. If you would like to look at some more info that I have done up on using a gold dredge, including a diagram as to how a dredge works, take a look at: OPERATING A GOLD DREDGE I hope you have found this information on planning and designing your own home made dredge useful. I wish you the best of luck with your home made gold dredge project, remember to measure twice and cut only once! | 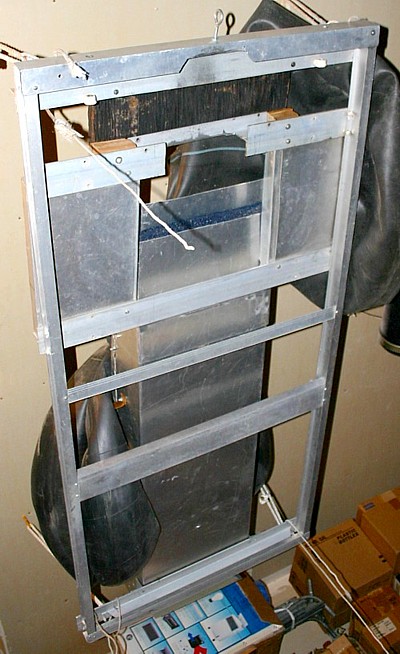 My dredge frame shown from underneath | |
| | ||
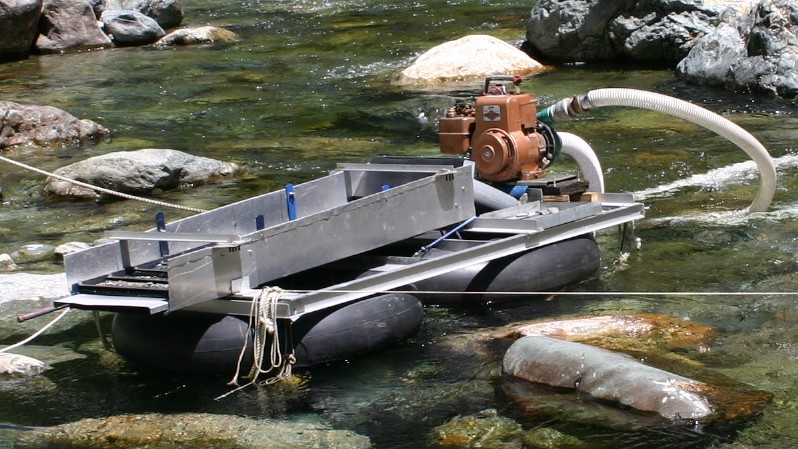 A close up shot of my home made dredge | ||
Comments: 0
Post a Comment